
Ideas for Updating Architectural Details of a Home
There is a famous expression “God is in the details.” Nowhere is this truer than in the design of architectural detailing for your home. By detailing, I am referring to the trim: crown mouldings, casings, baseboards and applied mouldings such as wainscotting.
In my opinion, this component is tied with lighting for the number one spot on the hierarchy of design elements. Nothing creates visual interest and adds character to a space like architectural details.
Designers and architects know certain rules exist. They also know that brilliance can come from breaking them. The trick is knowing when to follow and when to deviate. Factors that determine this are the floor plan of your home, its architectural style and the overall aesthetic you want to create. Commonly seen errors relate to scale and profile: trim that is diminutive and profiles that are wrong for the period and architecture of the home.
Let’s review the rules and ways to break them to create a stunning interior.
What Goes Around Comes Around
Install one style of casing and baseboard profile throughout the main floor of your home. This ensures the cohesive look or flow that we are always striving for. Add visual interest in certain spaces with the addition of wainscotting or ceiling details but don’t change the profile or height of the casing or baseboard. The two profiles will eventually hit and when they do it isn’t pretty.
The exception to this rule is with different floors in a home. For example, if the ceilings in your basement are lower and you need to change up the height of the baseboard and width of the casing then do so. However, try to stick with the same profile.
Choosing a Profile
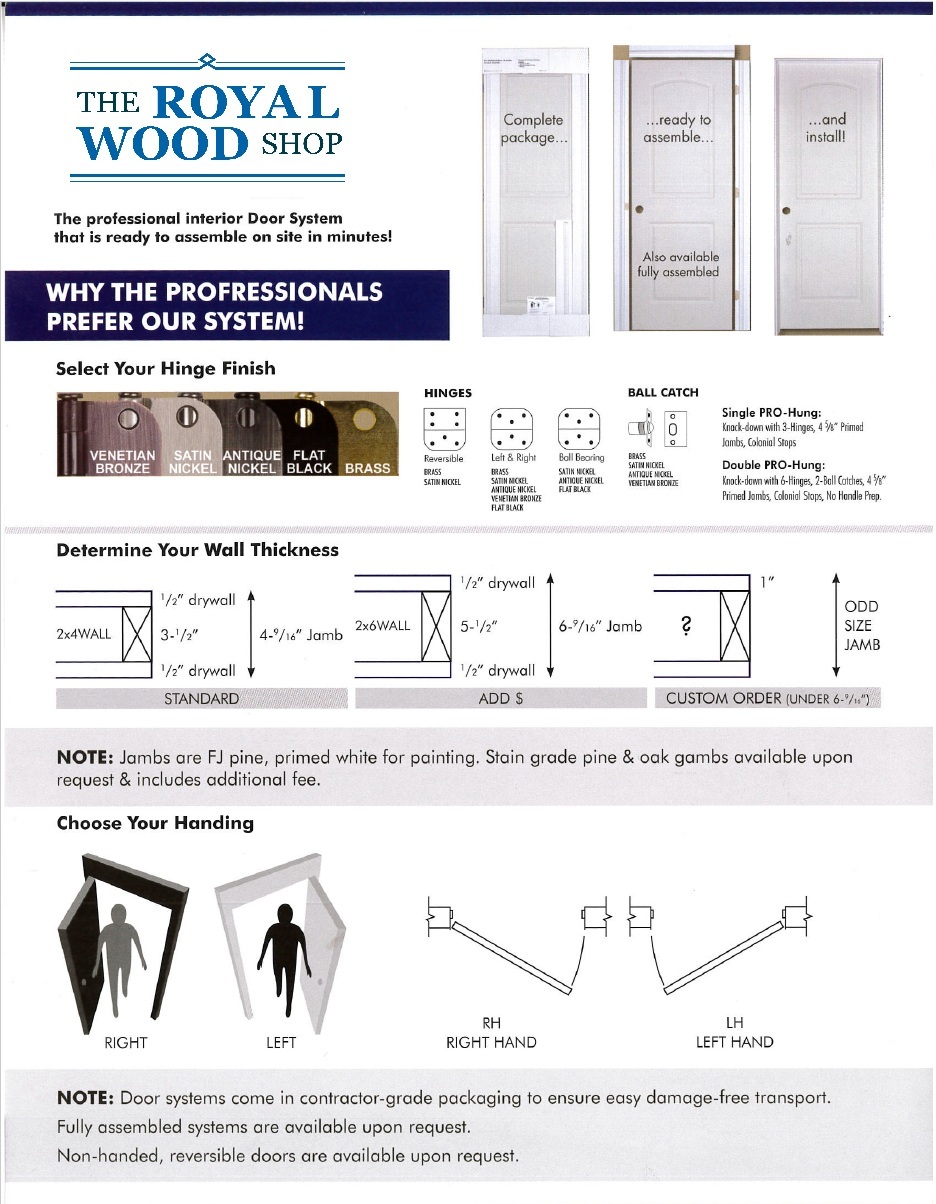
There are numerous trim suppliers from the big box stores to the small specialty wood shops. The Royal Wood Shop in Aurora is a personal favourite. It is very well known to the trade for offering an extensive selection of mouldings in various woods. Pick up a catalogue or go online at www.royalwoodshop.com and review the profiles offered. If a stock moulding does not appeal to you there is the option of having it custom-made.
The main considerations for choosing your profile are the architectural style of your home and the ceiling height.
For example, in a Tudor home, I would choose a “two-step” profile. For a builder home in the ‘burbs, the slate is clean. Do you want the traditional detail of a Colonial profile or the elegant, classic look of an Ornamental profile? A favourite of mine is the Regal collection. Depending on the casing width, the Regal is 2-3/4 inches wide; you may want to add a back-band.
Remember the casings and baseboards should be the same style. The profile for both should be the same. The crown moulding should be an extension and complement the profile of the baseboard and casing. Elaborate crowns with dentil moulding do not work with a simple baseboard profile.
Ceiling height is the number one consideration when choosing baseboard and crown moulding heights. The general rule of thumb for standard eight-foot ceilings is five-inch baseboard and crowns in the “400 series” height (roughly four inches in height). For ceilings over nine feet, look at the seven-inch baseboard and 500 series, or higher, crown moulds. If you have an eight-foot ceiling and an open floor plan, try a seven-inch baseboard and 500 series crown.
To emphasize the main floor entry and create focal points, design custom headers with cap mouldings and frame entries with plinth blocks.
Choose from MDF or solid wood/poplar paint-grade mouldings. I recommend high-traffic homes stick with paint grade, solid wood baseboard. Plaster crown mouldings are a more expensive alternative to paint-grade wood, but the highly customized installation delivers a seamless appearance.
Wainscotting or Panelling
For generations, wainscotting was installed to protect walls from daily abuse. Its enduring appeal is due not only to its practicality but to the authenticity it lends to newer homes by providing an established look.
Good planning is key for successful wainscotting installations. In spaces such as dining or living rooms, the horizontal layout is determined by artwork and furniture placement. In the foyer or entry, the spacing should be as consistent as possible. Let’s take a look at the numerous styles that are available.
Applied Mouldings
This is the most economical of all the installations. A chair rail and decorative mouldings are applied to the walls. The removal of existing baseboards is not required by you need a good mitre saw. This style is more formal and well suited for a traditional interior scheme. You are not restricted to installing rectangular shapes below the chair rail; for an elegant old-world look, install applied mouldings above and below. Apply mouldings that are at least 1-1/2 inches wide for your shapes. Standard chair rail heights for an eight-foot ceiling are 32 to 36 inches and for a nine-foot ceiling, 36 to 42 inches.
Recessed Panel
This is a more extensive application where the existing baseboard is removed, four-inch-wide MDF panels are applied to the drywall and baseboard is applied on top. Depending on the height of the top chair rail or cap moulding, one or two shapes may be applied. The panel can be left as a Shaker-style panel or a moulding can be inset in the shape depending on the depth of the applied MDF. This application is universal and suits both a traditional and contemporary aesthetic.
Push the height to the limits. I like to install chair rails as high as five feet from the finished floor. The higher the wainscot, the higher the ceilings will appear.
Raised Panel
The most elaborate and traditional of all applications, this is not for the do-it-yourselfer. Stick to traditional chair rail heights for this application.
Bead board/tongue and Groove Panelling
An unmistakable casual, cottagey, nautical look comes with this treatment. Again, the baseboard must be removed for this installation. You can purchase five-foot sheets of MDF that closely resemble the traditional tongue and groove or go the authentic route.
If you are planning to re-do your trim or add some detailing, such as wainscotting, take the time to visit specialty wood shops and review all the options available to you. Buy home design magazines and look for ideas that appeal to you then personalize your application.
Tricks of the Trade
Purchase four-foot lengths of your trim and crown mouldings, paint or stain them and install them in various points throughout the home. It can be difficult to visualize the final effect of trim so take the time to do sampling.
For clients with a tight budget, add back-band mouldings to existing window and door casings. It is very labour intensive and costly to install new casings throughout a home. Adding back-band is a very cost-effective way to beef up casings at a fraction of the cost. Royal has a great selection is backs to choose from.
Planning on adding crown moulding? Consider the addition of recessed retrofit halogen pot lights. Your contractor or electrician can pull out the wires along the wall and ceiling line and install crown moulding to conceal the wiring. This reduces extensive drywall repairs and will save you time and money.
If you are changing your baseboard, forgo standard quarter-round and install shingle moulding in its place. It’s the same size as quarter-round but is more finely detailed. The detailing is superior and will enhance the overall look.
When choosing the size of your chair rail for wainscotting, consider the size of your back-band on your existing door and window casings. Why? The chair rail or top cap moulding will run into the back so they should be a similar scale.
Always allow the wood to acclimatize before installing and ensure that proper humidity levels are maintained in your home to prevent excessive swelling and shrinkage.